You are here: Client menu > CLAIMS > Client Level Claims
Client Level Claims
To navigate to the claims tab, click SEARCH > client Details > CLAIMS. The claims tab serves as a way to keep track of all policies with an open claim. Closed claims may be displayed as desired by using the filters at the top of the page. Open claims will display by default until the claim is closed.
For information on generating a new claim, see Servicing
> Claims.
Note: A maximum of 2000 records can be returned in a search.
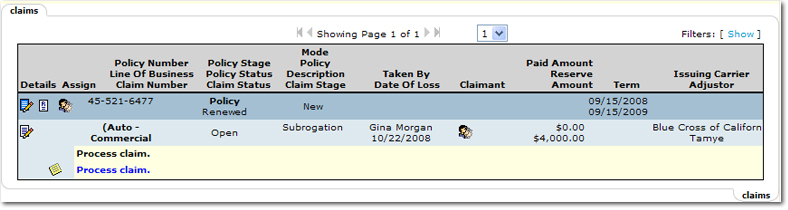
Policies that are restricted are displayed only if the person logged on is assigned to them. All other non-restricted policies are displayed and can be searched for by all staff members. There are several options when working with policies on the claims tab. Notice the options at the top of the claims tab and the active icons within the tab.
The following options are available when working on the claims tab:
- Showing Page: The Arrow

 icons can be used to navigate through pages of search results.
- First Page
 icon.
icon.
- Previous Page
 icon.
icon.
- Next Page
 icon.
icon.
- Last Page
 icon.
icon.
- Page List: Click the Page List
 arrow to open a list of all search results pages. Select the desired page number to open that page of search results.
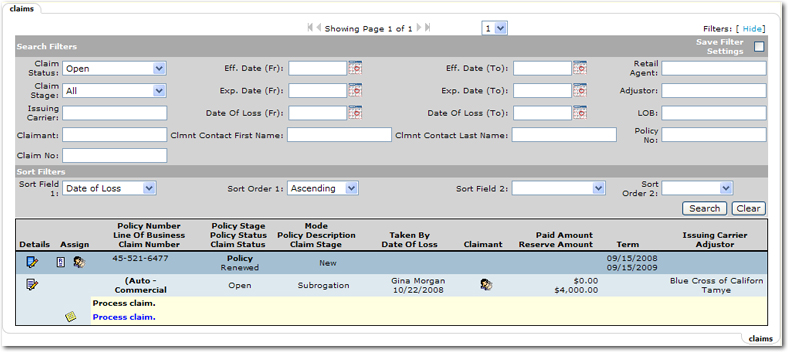
- Search Filters: Click [Show] or [Hide] to toggle the Search Filters screen.

The options available on the Search Filters screen are:
- Save Filter Settings: Selecting the Save Filter Settings check box on the Search Filters screen and clicking Search will change the default Search Filter setting. The next time the claims tab is opened, the policies returned will be filtered by the saved setting. Exercise caution when using the Save Filter Settings check box with a date range as returned policies will be restricted to that date range. As a general rule, check the filter settings each time this tab is accessed.
- Claim Status: Select either Open or Closed.
- Claim Stage: Select the stage of the claim. The stages are set up by each organization in Lookup Management > Policy > Claim Stages.
- Issuing Carrier: An Issuing Carrier is the company that issues the policy. Enter at least two characters to narrow the search results. Entering some of the Issuing Carrier name returns a broader result, enter most of the Issuing Carrier name for more specific results.
- Claimant: Enter the name of the claimant to return results that include all policies for that claimant. Enter at least two characters to narrow the search results. Entering some of the Claimant name returns a broader result, enter most of the name for more specific results.
- Claim Number: Enter some or all of the claim number. Enter at least two characters to narrow the search results. Entering some of the Claim Number returns a broader result, enter most of the Claim Number for more specific results.
- Eff. Date (Fr): Click the Calendar
 icon to select the beginning date in a date range. A date range can be selected to return policies with term effective dates in the date range. Click the Variable
  icon and enter a variable number of days to set a continuous date range to be used with Save Filter Settings. Enter + or - and the number of days up to three digits. The date will then be + (after) or - (before) the current date. Policy term effective dates can be created three ways:
- If an opportunity was created and sent to marketing, the policy term effective date will default to the X/BOR Date of the opportunity.
- If a marketing submission was created clicking SERVICING on the Client menu, the policy term effective date will default to the Eff. Date entered on the servicing tab.
- If a marketing submission was created by clicking MARKETING on the Client menu, the policy effective date will default to the current date.
- Exp. Date (Fr): Click the Calendar
icon to select the beginning date in a date range. A date range can be selected to return all policies with term expiration dates in the date range. Click the Variable icon and enter a variable number of days to set a continuous date range to be used with Save Filter Settings. Enter + or - and the number of days up to three digits. The date will then be + (after) or - (before) the current date.
- Date of Loss (Fr): Enter the Date of Loss. Click the Calendar icon to select the beginning date in a date range. A date range can be selected to return all policies with term expiration dates in the date range. The Date of Loss was first entered on the servicing tab when the claim was opened. The Date of Loss can also be found on the POLICIES > claims tab. Click the Variable icon and enter a variable number of days to set a continuous date range to be used with Save Filter Settings. Enter + or - and the number of days up to three digits. The date will then be + (after) or - (before) the current date.
- Clmnt Contact First Name: Enter the first name of the claimant contact to search. Enter at least two characters to narrow the search results. Entering some of the first name returns broader results, enter most of the first name for more specific results.
- Business Type: Click the Ellipsis
 button to select a business type for which to search.
- Eff. Date (To): Click the Calendar icon to select the ending date in a date range. A date range can be selected to return all policies with term effective dates in the date range. Click the Variable icon and enter a variable number of days to set a continuous date range to be used with Save Filter Settings. Enter + or - and the number of days up to three digits. The date will then be + (after) or - (before) the current date.
- Exp. Date (To): Click the Calendar icon to select the ending date in a date range. A date range can be selected to return all policies with term expiration dates in the date range. Click the Variable icon and enter a variable number of days to set a continuous date range to be used with Save Filter Settings. Enter + or - and the number of days up to three digits. The date will then be + (after) or - (before) the current date.
- Date of Loss (To): Enter the Date of Loss. Click the Calendar icon to select the ending date in a date range. A date range can be selected to return all policies with term effective dates in the date range. The Date of Loss was first entered on the servicing tab when the claim was opened. The Date of Loss can also be found on the POLICIES > claims tab. Click the Variable icon and enter a variable number of days to set a continuous date range to be used with Save Filter Settings. Enter + or - and the number of days up to three digits. The date will then be + (after) or - (before) the current date.
- Clmnt Contact Last Name: Enter the last name of the claimant contact to search. Enter at least two characters to narrow the search results. Entering some of the last name returns broader results, enter most of the last name for more specific results.
- Retail Agent: Retail agents are outside producers that broker business through another agency because they do not have a market. Enter at least one character to narrow the search results. Entering some of the Retail Agent name returns a broader result, enter most of the Retail Agent name for more specific results.
- Adjustor: Enter all or part of the name of the adjustor. Enter at least two characters to narrow the search results. Entering some of the Adjustor Name returns a broader result, enter most of the Adjustor Name for more specific results.
- LOB: Enter the line of business for the policy. Enter at least two characters to narrow the search results. Entering some of the line of business title returns broader results, enter most of the line of business for more specific results.
- Policy Number: Enter all or part of the Policy Number. Enter at least two characters to narrow the search results. Entering some of the Policy Number returns a broader result, enter most of the Policy Number for more specific results.
- Sort Filters: Use the Sort Filters to sort the results of the claims search.

The options available on the Sort Filters screen are:
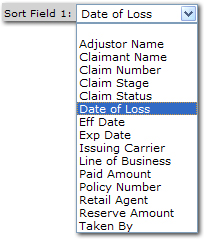
- Sort Field 1: Select a column heading from the Sort Field 1 list. The search results will be sorted by the column selected in the Sort Field 1 list. The available selections are:
- Sort Order 1: Select either Ascending or Descending to set the order of the policies returned. Ascending will set the order from A-Z. Descending will set the order from Z-A. The Sort Field 1 will be the first sort and Sort Field 2 will be the sub sort.
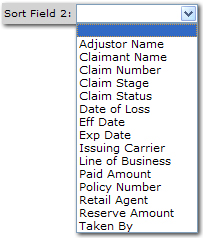
- Sort Field 2: Select a column heading from the Sort Field 2 list. The search results will be sorted by the column selected in the Sort Field 2 list. The available selections are:
- Sort Order 2: Select either Ascending or Descending to set the order of the policies returned. Ascending will set the order from A-Z. Descending will set the order from Z-A. The Sort Field 1 will be the first sort and Sort Field 2 will be the sub sort.
- Clear: Click Clear to remove all entries in the Search Filter and Sort Filters fields.
Important: Clicking Clear does not remove the Save Filter Settings selection.
- Search: Click Search. The results of the Search Filter criteria and Sort Filter settings are displayed. A maximum of 2000 records can be returned in the search results.
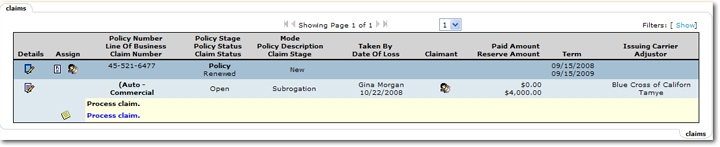
The following columns are displayed in the claims search results:
- Details: There are two types of Details icons that will each give access to different information:
- The blue Client Details
 icon beside the entity name will display the underwriting tab.
- The Claim Details
 icon will display thedetails tab for that policy. Right-clicking the Policy Details icon will display the following navigation
options:
icon will display thedetails tab for that policy. Right-clicking the Policy Details icon will display the following navigation
options:
- Open: Opens the claim details tab.
- Print: Click this link to print the forms associated with the policy.
- Retail Agent: If a Retail Agent is associated with the client, the Retail Agent
 icon will be displayed. Click the Retail Agent icon to open the Retail Agent > card file tab.
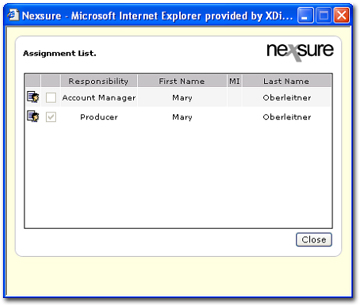
- Assign: Click the Assign
 icon to display the Assignment List dialog box with the list of people in the agency assigned to this policy. The Assignment List is populated
from the assignment tab.
icon to display the Assignment List dialog box with the list of people in the agency assigned to this policy. The Assignment List is populated
from the assignment tab.
- Action Description: The Action Description is displayed.
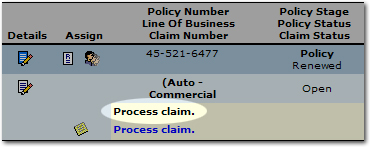
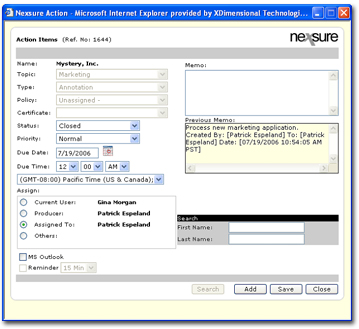
- Action Items: Click the Action Items
 icon to display the Action Items dialog box. The action can then be modified or updated.
- Policy Number: The Policy Number associated with the claim.
- Line of Business: The Line of Business the policy was created for. The line
of business is identified on the underwriting tab. Holding the cursor over the Line of Business will display the information in a larger font for ease of reading. Clicking the item in the summary view will open a display box containing the selected information.
- Claim Number: The Claim Number is displayed. Holding the cursor over the Claim Number will display the information in a larger font for ease of reading. Clicking the item in the summary view will open a display box containing the selected information.
- Policy Stage: The current stage of the policy. Possible stages are:
- Marketing: This
stage is displayed for marketing policies that are currently in the process
of being worked on or submitted to a Carrier. See
Servicing > Marketing.
- Policy: This
stage is displayed for in-force policies.
- Edit: This
stage is displayed when a policy is in an Edit stage. An
Edit would be used to make an internal change to an in force policy that
would not need to be sent to outside parties such as the Carrier or the
Client. See
Servicing > Edits.
- Endorsement: This
stage is displayed when a policy is in an Endorsement stage. An
Endorsement would be used to make a change to an in force policy that
would require a change request to be sent to the Carrier. See
Servicing > Endorsements.
- Audit: This
stage is displayed when a policy is in an Audit stage. The
Carrier normally initiates the Audit with the Client and the audit is
based on a prior time frame. When
the audit is completed, the Carrier sends a copy to the Agency for their
records. See
Servicing > Audit.
- Policy Status: The User identifies the status
during the Servicing process. The
status is displayed in both the policy summary view and on the home menu
links, if applicable. This
results in a quick overview of a Client’s policy and lets the user know
if there is any servicing being processed on a policy and the status of
the item. The
statuses of a policy are:
Note:
If a policy
is being worked on and the Status is changed in the header, make sure
to click the Save Changes link
under the policy header to save the change.
- 2nd Request: A
copy of the item being processed has been submitted to the Carrier and
there has been no response. The
status would be changed to 2nd Request and the item re-sent to the Carrier.
- 3rd Request: A
copy of the item being processed has been submitted to the Carrier twice
and there has been no response. The
status would be changed to 3rd Request and the item re-sent to the Carrier.
- Declined by Carrier: The
Carrier declined to write the coverage being requested for the Client.
- Declined by Client: The
Client declined to write his coverage with the Carrier.
- Empty: This
status is only displayed on a Marketing policy for a new line of business.
- No Response: There
has been no response from the entity to which information was sent to.
- Pending: The
information is incomplete and the item is pending until further information
can be gathered.
- Pending Approval: The
item being worked on is pending approval from the Carrier.
- Quoted: The
user has received a quote from the Carrier.
- Submitted: The
item being worked on has been submitted to the Carrier for a quote or
approval.
- Pending Cancellation: A
policy that is in the process of being canceled by the cancellation has
not yet been finalized.
- Reinstated: A
canceled policy that was reinstated with no lapse in coverage.
- Rewritten: A
canceled policy that was rewritten with either a new Carrier and/or new
effective dates.
- Claim Status: Reflected as either Open or Closed. The Claim Status is assigned on the policy claims > details tab.
- Mode: The policy Mode is displayed. All possible mode types are:
- New
- Renew
- Re-New-Co
- Policy Description: Displays the description of the policy. The description is initially entered when the policy is in the Marketing stage.
- Claim Stage: Displays the claim stage selection from the claims > details tab.
- Taken
By: Displays
the employee who entered the claim information. The employee is identified at logon.
- Date
of Loss: Identifies the date the loss occurred.
- Claimant: The Claimant
 icon is displayed if there is any claimant information. Click the Claimant icon to open a schedule of the claimant names and phone numbers.

- Paid Amount: Amount paid out for the claim. This
amount is entered on the policy claims > details tab.
- Reserve
Amount: Reserve amount for the claim. This
amount is entered on the policy claims > details tab.
- Term: Populated
from the effective and expiration date fields on the underwriting
tab.
- Issuing Carrier: An Issuing Carrier is the company that issues the policy. The Issuing Carrier is identified on the underwriting tab in the policy header.
- Adjustor: The Adjustor name displays only if entered on the policy claims > details tab.
Claims Details